Sunday, July 28, 2019

pop socket repair

The cap to my pop socket phone holder broke. It was held on by 4 tabs that fit into small slots in the plastic.
I made a replacement cap out of three different pieces of wood. I glued it with wood glue and clamped it. Then I cut it with an adjustable hole saw. But forgot to account for shrinkage when sanding, so it's a bit small. sanded, clear coated, attached with tiny nails with heads large enough to stay in the slots. I also glued in a piece of dowel to fill the hole.


Tuesday, July 16, 2019

Tea Machine- Splash Shield

To protect the arduino and other electronics from being splashed, I added a cover made of clear plastic, this also helps support the switch box. It might look better with a slightly frosted plastic to hide the wiring, but for now I just used the clear plastic I already had from a large pretzel container.

Friday, July 12, 2019

Tea Machine- Indicator Light

The next addition to the tea machine is an indicator light that sits just under the coffee maker base. It has three 5mm LEDs, one for each time setting. The green is lit up from 3 and a half to 5 minutes, the yellow indicates 5-10 minutes, and the red is 10 plus minutes. The yellow has a white lens. I added 1000 ohm resistor, shared by all three LEDs.
The timing of the lights is controlled by the arduino. I added the code for the timing of each light. The pins needed to be configured as OUTPUT in order to send the correct current to the LEDs.

Sunday, June 30, 2019

Tea Machine- Now with Robot Arm


My tea maker project is built around a basic coffee maker. I added 3 timers powered by an arduino uno. After the first 3.5 minutes, the contactor turns off the power to the coffee maker to stop dispensing hot water. After 5 minutes, a buzzer goes off. After 10 minutes, another beeper sounds.

This week, I replaced the AC adapter I was using with a power board. It has a common cathode dual diode, a capacitor and an LM7809.

The newest part I added is a servo motor attached to a bent plastic knife to take the tea bag out automatically after the first 3.5 minutes. I had started working on this 2 years ago, but now I have finally added the code needed to control the servo. The first test didn't go so well, jerking the tea bag out too quickly and splashing hot tea on the counter. To fix it, I could have changed the code to run the motor slower. Instead, I hung the tea bag closer to the end of the arm, and added a splash shield.

here is the code:
#include

Servo myservo;  // create servo object to control a servo
int pos = 0;    // variable to store the servo position
int loudPin = 12;               
int HotPin = 11;
int louderPin = 10;
void setup()
{
  myservo.attach(9);  // attaches the servo on pin 9 to the servo object
  pinMode(loudPin, OUTPUT);
  pinMode(louderPin, OUTPUT);
   pinMode(HotPin, OUTPUT);// sets the digital pin as output
}

void loop()
{ for (pos = 90; pos <= 177; pos += 1) { // goes from 0 degrees to 180 degrees
    // in steps of 1 degree
    myservo.write(pos);              // tell servo to go to position in variable 'pos'
    delay(15);     
  digitalWrite(HotPin, HIGH); 
  delay(210069);                 
  digitalWrite(HotPin, LOW);
  for (pos = 177; pos >= 90; pos -= 1) { // goes from 180 degrees to 0 degrees
    myservo.write(pos);              // tell servo to go to position in variable 'pos'
    delay(15);   
  delay(90000);
  digitalWrite(loudPin, HIGH); 
  delay(3000);
  digitalWrite(loudPin, LOW);
 delay(300000);
  digitalWrite(louderPin, HIGH); 
  delay(3000);
  digitalWrite(louderPin, LOW);
  delay(3000000000000000420);
}
}
}

Friday, June 28, 2019

Quick Connect Pressure Gauge


After replacing a failed regulator, I decided to reuse the old gauge from it in a project. I used a 1/8NPT27 tap to cut threads in the inside of a male Quick Connect fitting. Then I screwed the two parts together and wrapped electrical tape around it to provide a softer grip. (The tape is not for pressure or sealing leaks).
I can use the gauge to check the pressure coming from an air hose, without having to go look at the stock gauges on the air compressor. Our compressor stops at 120 psi, but the gauge can measure up to 160 psi.

Thursday, June 20, 2019

Solar Power System Part 3- 2.2 Channel Speaker System

I have had an amplifier and speakers in my "lounge area" for a few years. I've changed speakers, amplifiers, and the power system a few times, but the basic set up is still the same. The  speakers I have now were part of a set of 5 that I bought at Goodwill. Now I finally have the speakers powered by my solar battery box.


The batteries are charged by the solar panel, and then connected to the amplifier, which is connected to 8 speakers. There are 4 speakers per channel, with 2 channels. I have 2 subwoofers and 2 full range drivers per channel. This creates a powerful, well-balanced sound in a small space. The amplifier is capable of putting more than 30 Watts into the speakers, but I rarely go above 1 Watt. Each of the full range drivers can handle 120 Watts. My original goal was to have a bed-shaking loud alarm clock powered by solar, but the alarm app wouldn't output at full volume and it wouldn't always turn on at the right time. 


I also added a laser indicator light so I remember to turn off the speakers when I leave the room or go to bed. If I leave it on, the speakers make random popping sounds that could damage them. The laser dot is projected onto one of the speakers. I got this idea from a hard drive light that projects onto the desk.

Impact Wrench Battery Rebuild


I bought an old Snap On impact wrench at a garage sale recently. It's a good brand that's usually too expensive for me to buy. It came with two batteries, but I thought even if I had to buy a new battery it might still be a good deal.
After testing it out for a couple of weeks, I found that one of the batteries wasn't holding a charge and the charger said it was bad. I attempted to charge it with a different charger, but it still wouldn't charge all the way. After looking at prices for the name brand battery pack, I decided to look at battery rebuild kits instead. The pre-assembled ones were still too expensive, so I decided to buy 12 individual sub C nickel cadmium cells and solder them together myself.
Opening the plastic case was straightforward, just requiring a T10 torx bit. I watched several Youtube videos on battery pack rebuilding so I knew what supplies I would need.

First, I arranged the cells in the same pattern as the original battery pack, and hot glued them together.
Then I used nickel plated steel strip to connect them. I was worried that soldering might make the cells too hot. The proper way to attach them would be with spot welds. Soldering did work, but the heat might shorten the lifespan of the cells. It was difficult to get the solder to stick in some spots, so I had to sand the ends of the cells

After I attached and connected the cells, I tested the fit in the original case and added a new piece of foam to the bottom. The cells seemed to fit well, but when I tried to slide the battery in and out of the tool, I found that the button on one side wouldn't release.  the negative connector was shifted slightly, so I had to take it apart again, and resolder one of the connections. After that, the buttons functioned perfectly. Now it holds a full charge.

Monday, June 17, 2019

Cordless Power Tool Storage


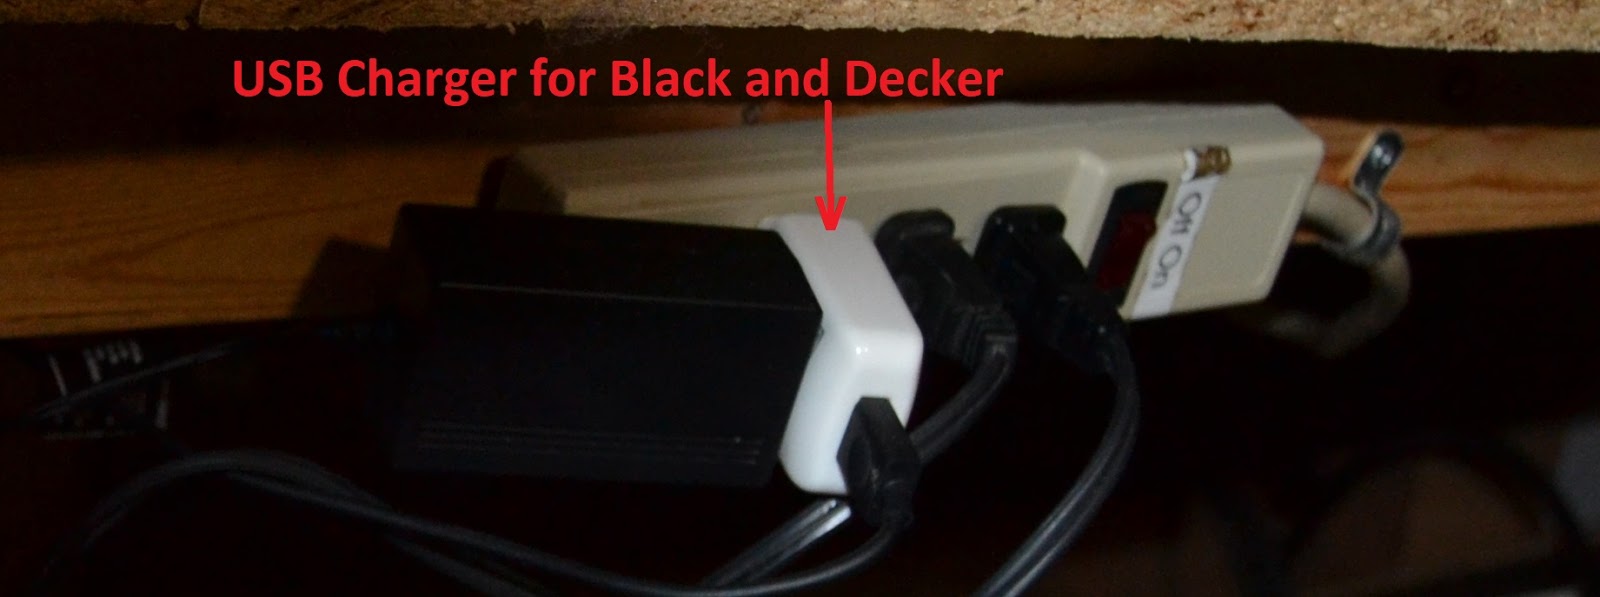
After watching a video on cordless power tool storage solutions, I decided to build my own. I wanted something quick and easy to modify later. Right now, I have 4 cordless power tool systems, each with a different charger and battery type. I have the Snap-On 14.4 V Ni-Cd slide battery, Craftsman 12V lithium, Worx 20V lithium, and Black and Decker 4V(internal lithium). I want to make sure the batteries are charged and ready for whatever projects my family is doing, and keep the spare batteries from getting lost.
To attach the Snap-On and Craftsman chargers, I used the keyhole mounts on the back. All I had to do was install 2 screws each, and then the chargers slide on because they are designed to be mounted. The Worx charger is not designed to be mounted, so I made a shelf for it. Then I added a piece of wood to mount the Snap-On impact wrench and its spare battery, and the Craftsman drill. I might need to add more wood to make a shelf with a back so things can't fall off.
I mounted a power strip above the chargers so I can plug them all in.
These are all around the end of the workbench on the left, easy to access from the door into the garage. The plan is to keep the area in front of the work bench and underneath mostly clear so that the truck could still fit in the garage if we get the rest of it cleaned out.

Power Strip

Wednesday, June 12, 2019

Beep Switch (Solar Power part 2)

One thing that the solar power system contains is a beeper. This is a continuation of the "dinner bell" project. Using one pair of wires from the phone lines in the house, my parents can press a button in the kitchen downstairs and it will sound the buzzer upstairs in my room. This is now successfully powered by my solar battery bank.

Wednesday, May 22, 2019

Solar Power System- Part 1- Battery Box

For my solar power system, I have an array of 3 12V 8 Amp Hour sealed lead acid batteries wired in parallel to get 24 Amp Hours. As a project for my shop class, I decided to build a nice box to store them in. I needed this because they are heavy and have to be moved with the rest of the charging circuit as a unit.  After I assembled the pieces of MDF and plywood, I painted them the closest color to white that was available. I added small hinges from a bucket sale at the local Habitat for Humanity Restore. The part of the project for class was just the woodworking, but I added a few switches at school. I also mounted an ammeter on the front, an automotive power outlet, and a desk grommet for the wires to pass through.


After I brought the box home, I added a ceramic handle on the lid. I installed the batteries, charge diode, 10 amp ATM  fuse, and a beeper for my dinner bell system. I added magnetic lid latches to keep the lid closed. The whole system is connected to a solar panel which charges the batteries. I mostly use it to power my speaker system.


Amazon Affiliate link to a 3 inch cord grommet: https://amzn.to/2JYSK6j
link for the fuse assortment I bought: https://amzn.to/2wdCWV1
link for 12V 8AH battery: https://amzn.to/2EpVrdk