Friday, July 14, 2023

Improved Welding Wire Spool Holder

My dad complained about how much space my previous spool holder took up, so I decided to build something that would have a smaller footprint. The base is made from 3/4 inch angle iron, and the upper frame is made out of rebar. I used a stainless bolt and welded on a matching nut to hold the spool. This worked out fine even though welding dissimilar metals is not the best idea. I drilled a small hole in the top of the welder for the wire to pass through. Once the wire was inside the welder it needed to turn a corner, so I used an empty spool as a guide/pulley.


Learning Welding

My dad picked up a MIG welder complete with shielding gas tank a year or two ago. The first thing I needed was safety equipment (gloves and helmet). Once I started welding, I noticed that my welds looked bad, so I got a spool of flux core wire. To use this wire I needed to swap the polarity, but this welder cannot be swapped. I got a new welder, but my welds still looked bad. It turned out that the regulator was not allowing enough shielding gas flow. I got a new regulator, and my welds instantly improved. 

My first functional project is a watermelon cage to protect the watermelon in the garden from raccoons. I started with 2 10ft pieces of 3/8 rebar, and then cut it into smaller pieces. After I welded a frame, we attached chicken wire to the outside. 


Thursday, July 6, 2023

Welding Wire Spool Adapter


I was running low on solid mig wire. I found that an 11 pound spool would be the cheapest per pound. But it turns out that it won't fit in my welder. I suppose I should have read the whole instruction manual, but the spool didn't seem that large, and I didn't open the box at the store.

I had to decide whether to return the wire and buy several smaller rolls for a higher price, or find a way to force it to work. I tried to brainstorm some solutions- wind the wire onto smaller spools, make an adapter, mount the spool on the door, or shave off part of the rim of the spool. Eventually, I found a way to make a lazy susan to hold the spool on the open door of the welder. 

I used roller ball feet to make the lazy susan spin smoothly. Here's an Amazon Affiliate link to the bearings I used: https://amzn.to/3pyEBE1 First, I tried a cardboard circle underneath to support the spool. This showed me that the concept was good, but I needed a stronger base. Next, I used the bottom of a powdered drink mix can. For the center axle, I used a steel drink can. I cut it to make a smaller diameter to fit. Ironically, I couldn't use the new welding wire to weld the lazy susan together.

After I finished this project, I posted a photo to Reddit to get advice to help me learn to weld better. One person said "you can't weld something that isn't clean, all the paint and [stuff] on the outside of the can will [mess] up your weld." They also suggested using better materials to start with, so my next project will be finding more materials to experiment with.


Wednesday, June 28, 2023

Soda Stream with Large Tank Adapter

My dad bought two sodastream machines at a garage sale for $1 because he knew I wanted to try making my own soda flavors. He didn't realize all the accessories that I would need to go with them. Each machine came with a standard soda stream tank, but no bottles. So first we needed to buy a set of soda stream bottles (Amazon Affiliate link: https://amzn.to/445Rx3m ). 

I knew I would eventually need more CO2. Refilling the sodastream brand tanks is cheaper than buying sparkling water, but still expensive. Purchasing new tanks is $30 and exchanging them for full tanks is $15. Each tank is supposed to make up to 60 liters. 

I saw online that many sodastream users have found a way to add an adapter to use non-sodastream brand tanks, including larger tanks. This seemed like a more economical way to buy CO2. In my research, I found that there's a difference between welding-grade CO2, food-grade CO2, and beverage-grade CO2, and that it is sold through different types of businesses including home brew suppliers, welding supply stores, and industrial gas companies. I purchased a 5 pound tank of food-grade CO2 from a local welding supply store. The cost of this new filled tank was more than I expected (about 8 times more than the small sodastream tank), but the cost per tank of the refills isn't much more than filling the small ones. I also purchased  an adapter hose (Amazon Affiliate link: https://amzn.to/3qV1YYy ) to connect the taank to the machine.

The next thing I needed was flavorings. SodaStream sells some, including ones designed to taste like specific brand-name sodas. Other options are flavor extracts (root beer, vanilla, orange), juice concentrates, or powdered drink mixes. For the flavorings that don't have any sweeteners or sugars in them, I usually add or pre-mix with simple syrup because it dissolves more easily with less stirring so I don't lose as many bubbles. I tried root beer extract, but it was missing something. For the next batch, I added molasses and vanilla. I have been experimenting with making my own flavor extracts like lemon, lime, orange, and cinnamon. 


Wednesday, June 7, 2023

Solar Power System Part 7

For my solar power system, I replaced the charge controller because the old one stopped working. The charge controller prevents extra power from being sent to the storage battery once it is full. This extra power goes to waste unless I can find a use for it right away. I can charge things like phones, laptops, power banks, or tool batteries. Or I can use an inverter for small devices like a pencil sharpener. The inverter can't handle larger devices.


Next, I created a window pass-through cable. I used foil tap inside a vacuum sealed bag so the panel can be on outside on the roof to reach more sunlight and the window stays closed to keep the heat and noise out.  


Wednesday, May 17, 2023

Power Inverter

I got this inverter a few years ago at Goodwill. The store had sorted it with the cups because it's shaped like a cup to fit in a car cupholder. This inverter is not great for electronics, but my pencil sharpener seems to be fine with it. I mostly use it with my solar power system. 


The spiky wave is from the inverter. The smooth sine wave is from the grid (both through a 120v to 3v AC to AC transformer.)


Kiwi Dragonfruit Soda and Jam

 Now that I'm in college, I'm addicted to Mountain Dew. I like to try all the new flavors. Then I started thinking about how I can make my own flavors of soda. My dad bought a used soda stream machine at a garage sale, and then I checked out a cookbook from the library, "Homemade Soda" by Andrew Schloss. 

The first recipe I tried is for kiwi syrup. I made a 1/4 recipe with 1 kiwi and added a few frozen dragon fruit chunks for color. I chopped the fruit into small pieces and then cooked it in a pot with sugar. Then I strained it into a container and added lime juice. The fruit pulp left over was coated in sugar syrup. I tasted it, and it reminded me of jam. For the second batch, I used 2 kiwis. I blended the kiwis and dragon fruit in my magic bullet. I thought this would make it easier to get a smooth syrup. Instead, it made a thick fruit pulp that would not go through the strainer very well, so more of it turned into jam.


Monday, March 27, 2023

From the Archives- Spin Art Machine

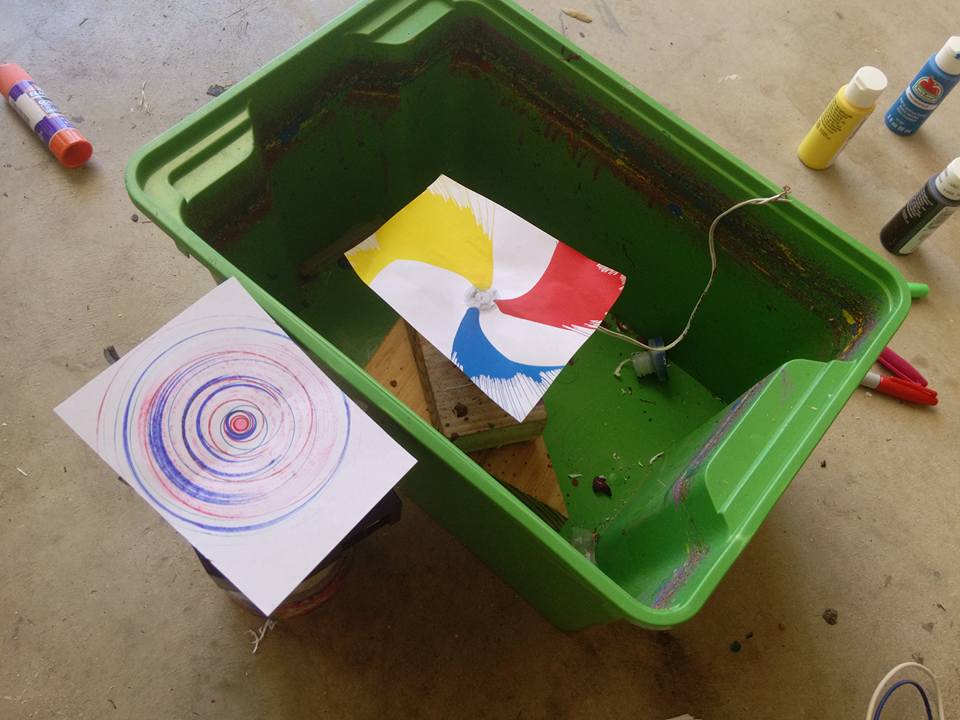
    The two spin art machines in the picture were a summer project in 2017. Griffin invited kids in the neighborhood to have fun and make some art with him.    
    Griffin has made many spin art machines in the past. He would start with an old motor, usually a large one. He has even used small motors like one from an electric toothbrush, or ones that came with electronics kits such as Snap Circuits (Amazon Affiliate link: https://amzn.to/3nnbYIy ) which already have experiments included for optical illusions with spinning circles.
    No matter what type of motor Griffin uses, he always makes sure that he applies the correct voltage for that type, so that it works well and doesn't get damaged. These spin art machines from 2017 were very basic, just a motor with alligator clips to connect to power. The motor shaft punches through the sheet of paper, and that can be enough to make the paper spin. 
    Markers work to make designs, but the patterns aren't very interesting. Paint makes great patterns, but is very messy! Griffin had the idea of putting the motor in a plastic bin to contain the splatter, but he didn't want to cut any holes in the bin. For this setup, he attached the motor to a heavy block of wood to anchor it, and then ran the wires out the top of the bin. The next step to prevent splatter was to add a lid with a target hole cut in the center. He made a lid from cardboard so he didn't have to cut a hole in the plastic lid that came with the bin, since this was temporary. 
    For smaller spin art machines with a tiny motor, Griffin would pre-cut the paper into circles. For larger setups with thinner paper, he would attach a cardboard circle to the motor shaft. He could use tape to attach it to the motor shaft more securely. It also supported the paper when it got wet and floppy from the paint. One time he tried a setup that could spin a two-foot circle. Unfortunately, it didn't spin very fast. 

Wednesday, March 15, 2023

Alarm Clock Repair

In college, it's important to wake up on time to make it to class. So my dad bought me a new battery-powered digital alarm clock. I liked this design because it uses a single AA battery which is easy to replace. Unfortunately, it was broken right out of the box. The one feature that is essential in an alarm clock- the alarm- did not work. My dad didn't want me to open it up to diagnose the problem because he thought he was going to return it or file a warranty claim instead. He procrastinated and did nothing, so after a year there was nothing stopping me from fixing it. I unscrewed the case and took a look at the circuit board. I used my electronics microscope to record what I saw. The problem with the sound was obvious. One of the pins on the piezo had no solder connecting it to the board. This was a quick fix. I resoldered it, and now it works.

Friday, March 10, 2023

Towel Repair and Decorations

 Although new fluffy towels are nice, the old ones are softer, dry faster, and take up less space in the wash. My favorite set that I have at college is the same set my dad took to college! It is starting to wear out, and needed some repairs and reinforcement.

I sewed white thread in zig zag stitch over a few holes. Then I couched over yarn in a wave pattern to keep the end of the towel from fraying. The triangle wave pattern was inspired by the standing wave reflection graphs from my engineering lab class.