Thursday, August 11, 2022

Sewing Machine Repair- Bobbin Winder


I was working on repairing my grandmother's old White 565 sewing machine. The bobbin winder didn't work. The rubber o-ring that provides the friction to engage the bobbin winder had crumbled. Like any really old tire, it dry rotted. 

This type of rubber ring is used by many sewing machine models, so it might not be that difficult to buy a new one. But I found a different solution using what I already had- Lego tires!


I found a tire that was the right size, popped it on, and now the bobbin winder works. The tire I used is part number 2346 which might be the same as 56897.

Headphone Covers


 My VR headset has cushioned headphones. They are made of perforated pleather over foam, which can get sweaty, but aren't easy to clean. I bought some commercially available washable fabric covers, but the material was too fuzzy/scratchy. So I decided to make my own out of soft t-shirt material. I had some very thin elastic left over from masks, and bought some slightly wider when that ran out.

First, I used a saucer as a template to cut out a circle of fabric. The size of circle I needed was larger than you might think because I needed to be able to fold over the edge to make a channel for the elastic.

It was difficult to figure out how to fold over the edge evenly. The circumference of the outer circle is more than the circumference of the sewing line, which means it had to be gathered or pleated. My mom helped with the folding. Instead of using millions of pins, she decided to use a glue stick. With the underside of the saucer as a guide, she made a thin circle of glue about an inch from the edge, and then folded the edge back a little bit at a time around the whole circle. 


I sewed two lines of stitching around the edge to secure it and form a tunnel for the elastic. It's more of a polygon than a perfect circle. The folds aren't very even, but that won't show once the elastic is in place.


I used a safety pin to thread the elastic through the tunnel, and then sewed the ends of the elastic together. Finally, I stretched out the elastic to distribute it evenly around the edges.  I made more sets so I can have a clean one while the other set is in the wash. I hope this will make the headphones last longer. The fabric is thin enough that it doesn't interfere with the sound.


Wednesday, August 10, 2022

Repair- Dental Tool Charging Base

 My dentist knows I like to work with electronics, and sometimes will save up a box of projects for me. This was a cordless dental tool that wouldn't charge. The base looks similar to a cordless toothbrush or a cordless phone. I think it's actually a polisher.


The dentist was worried that the rechargeable battery inside might have gone bad. After examining it, I found that one of the contact pins on the charging base wasn't there.


 Looking inside, I saw that it hadn't actually broken. The plastic pin that should have been melted to secure it was either missing or broken. 


I added hot glue to secure it. 


I put it back together, and now the charge light comes on when the tool is on the base and it seems to work fine.


Tuesday, July 26, 2022

Power Cord Upgrade for Iced Tea Maker

I have one of those kitchen devices that's like a coffee maker, but is just for making iced tea. It takes up a lot of counter space with its large rectangular pitcher, and it has a short cord, so it's hard to find a good place to plug it in. But the problem I had with it is that the cord was very stiff. 

Old cord is very stiff


I decided to replace the original short, extremely stiff cord with a longer, more flexible cord. Of course I chose a replacement with the same gauge and temp rating. First, I had to figure out how to open up the iced tea maker. There was a plastic cover on the underside, with several philllips screws and one annoying H-pattern security screw. Is it there for consumer safety or anti-repair? Once I defeated the security screw, it was easy to take off the cover. 

Security Screw


The inside was simple. The power cord came in and split into two, and then was connected to the system with clear crimp covers. I tied a knot in the new cord so it couldn't be pulled out, and used wire nuts to cover the new connections. Then I put the cover back on.

Ready to put the cover back on


Friday, July 22, 2022

Clothing Ventilation Device


I have been experimenting with small semi-portable fans. The battery-powered handheld foam-bladed fans are safe, but don't work very well. Another solution would be to direct air coming from an air conditioning vent. When I was in the backseat of a car, I used a rolled up sunshade to steal the air from the front seat.  But in my room, the vent is too far away and I don't have a ceiling fan. I wanted a quiet and powerful fan with a safe cover that I could use to cool my face and as a "clothing ventilation device." I found out later someone from the Unnecessary Inventions channel on Youtube, https://www.youtube.com/watch?v=gFIrnWOq8MA made one like that as a joke and called it a Jewel Cooler. But with summer temperature of over 105F here, I think it really is necessary. Most of the designs I've tried in the last couple of years have been based around PC fans of varying quality. The duct/housing has been made from plastic jars, a paper cup, and most recently a pencil case. This latest version uses a Noctua fan, a pencil case and has a fabric cover. It is powered off of my solar power system.


Wednesday, July 20, 2022

Air Conditioner Capacitor


It has been very hot here recently, with high temperatures above 105 F (40.6 C). Sunday morning, my mom complained about being hot indoors. It was 80 F.  We measured the temperature of the air coming out of the vent, and it wasn't any cooler. We figured out that the air conditioner wasn't working.

This happened just after the roofing company placed netting around the house to protect the windows and AC from falling shingles. Was this a coincidence, or did the netting over the AC restrict the airflow and add extra stress to the system? First we tried turning the AC off for about ten minutes, and peeling back the netting. But when we turned it back on, it still didn't fix it.

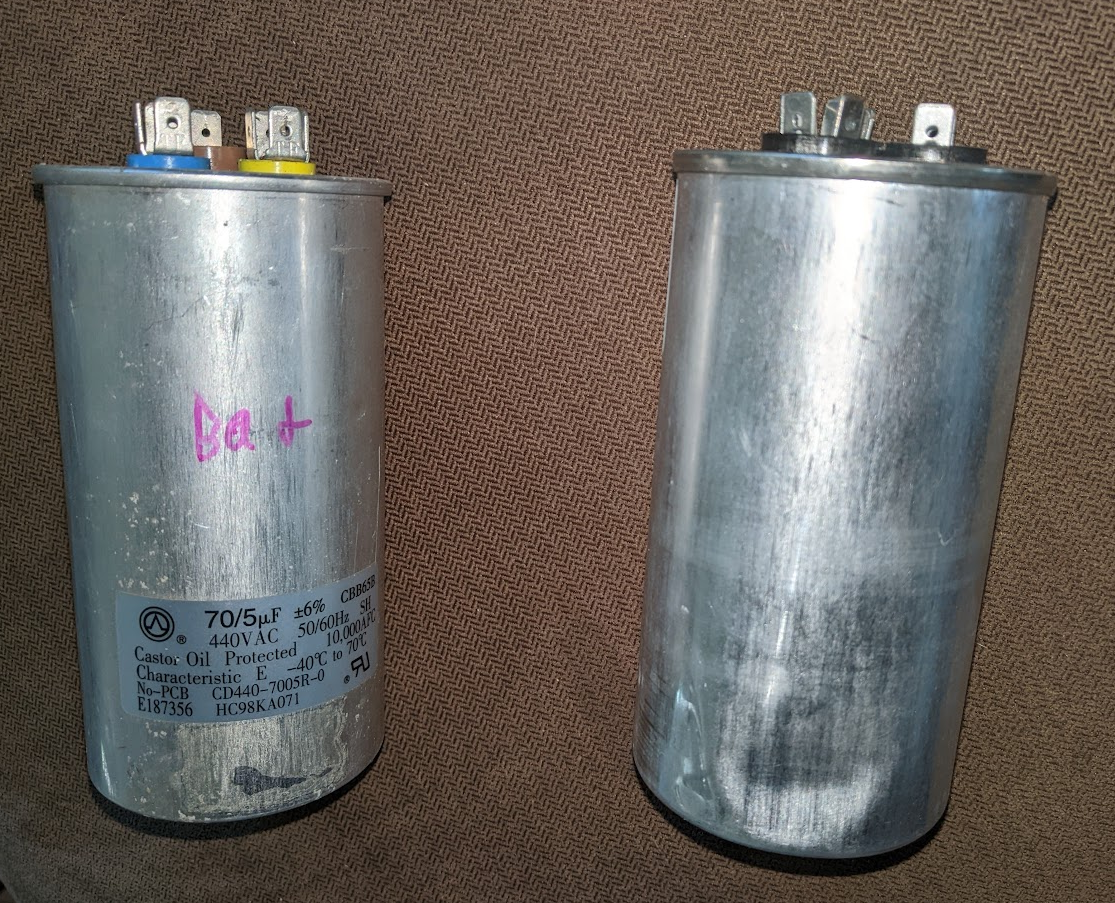
The air handler fan and condenser fans were still working, but there was no cooling. I took off the cover of the AC unit and tested the capacitor with my multimeter. It was a dual capacitor 70/5. The compressor part, which was supposed to be 70 microfarads, read 3 nanofarads. The fan part, which was supposed to measure 5 microfarads, measured .7 microfarads.

Once I figured out that the capacitor was bad, the next step was finding a replacement. My dad shopped for a replacement, but everywhere he checked either didn't have it in stock, or was closed on Sunday. Of course we could have called an AC repair place but that would have cost a lot more. My dad ordered a replacement from Amazon, which would take around 24 hours to get here. If the temperature inside kept rising the way it was, we'd probably have to stay at a hotel overnight. So he kept shopping, and finally found the exact capacitor we needed on Craigslist. It was over twice the price of the one from Amazon, but we could get it the same day. We met the seller halfway between their location and ours in a convenience store parking lot (probably safer for both of us because of all the sketchy stuff on Craigslist.)

The new capacitor didn't have the three terminals color coded like the old one, but it was easy to figure out how to connect it. We turned the AC back on, and immediately felt cooler. Now the air coming out of the vent is 57 F. 

About 12 hours later, the capacitor my dad ordered from Amazon arrived. We're not sure if we'll return it or keep it as a spare. It has a dent in it, which probably won't affect the function. 

Monday, July 11, 2022

Beef Jerky -on the Pellet Grill this time

(Reenactment of taking jerky off the grill)


After successfully making jerky in an air fryer/toaster oven/dehydrator, I decided to try making smoked jerky on a pellet grill (which replaced our gas grill that was damaged in a tornado). I used the same sauce as the previous batches- Worcestershire sauce, pineapple juice, garlic powder, onion powder, chive salt, black pepper, pepper salt. I also made a separate batch with commercial teriyaki sauce. It turned out much better than in the oven. 

The second batch on the pellet grill, I tried to use what I have learned so far to make it easier. First, I put the meat in the freezer for a few hours to make it easier to slice. I wish I could find a grocery store that would slice it for me- that would be even easier. Next, I marinated the meat in a ziploc bag instead of a container with a lid. With the bag, it had less surface area exposed to air, needed less marinade, and cleanup was easier. I also used grill liner mesh pans to cook the jerky on. It prevented the jerky from falling through the grill. It was simple to pre-load the trays indoors while the grill was starting. I didn't have to open the grill lid for very long when I put the trays on, so I didn't lose as much heat and smoke.

When the jerky was done I could have brought the whole mesh trays in, maybe on a cookie sheet. Instead, I just used tongs to transfer the jerky to a bowl and left the mesh trays outside until they cooled. Then I washed them in the dishwasher. There is a risk of tarnishing aluminum if you wash it in the dishwasher, but these pans are semi-disposable so I didn't care. The grill manufacturer recommended using the kind of racks for cooling cookies, but those were more expensive with non-stick coatings, and none of the ones I found actually said they were safe for baking. 

The grill liner mesh pans can be purchased through Amazon, although they are cheaper from Walmart. Here's my Amazon Affiliate link for the mesh pans: https://amzn.to/3nlMOXs 

and for the pellet grill: https://amzn.to/3yTYuHg

Sunday, July 10, 2022

Cheap Sewing Machine Needles

 We bought some sewing machine needles online that were really really cheap. But it was a deal that was too good to be true. Apparently their quality control is abysmal. My mom tried sewing with the needles, and had a lot of problems with thread breaking or tangling. It probably wasn't her sewing machine, because changing the needle helped. But the proof was when she found needles with no holes!

Photo taken with digital microscope.


Thursday, July 7, 2022

This Pincushion is a Piece of Cake


We bought a grill and installed a new ceiling fan, and had blocks of styrofoam left from the boxes. I wanted to recycle the foam, but I had trouble finding somewhere to recycle it. I did find one business recycling company, but they would have charged $20 to recycle the small amount I had. So I decided to think of ways to reuse it instead. I remembered the last time I made a pincushion as a present for my mom, I used foam as the core.

This time, I didn't want to make a plain cube shape. A lot of pin cushions are spherical. A sphere might be the safest shape to stick pins in so you don't stab yourself, but I don't have an easy way to make a sphere. I looked at the foam I have, and thought about making a funny shape like a slice of bread or a wedge of cheese. I finally decided on a slice of cake.

It's pretty safe to cut foam with a hot wire tool or a knife. I used a miter saw because it's mounted to my workbench. There's a lot of dust to clean up after that.


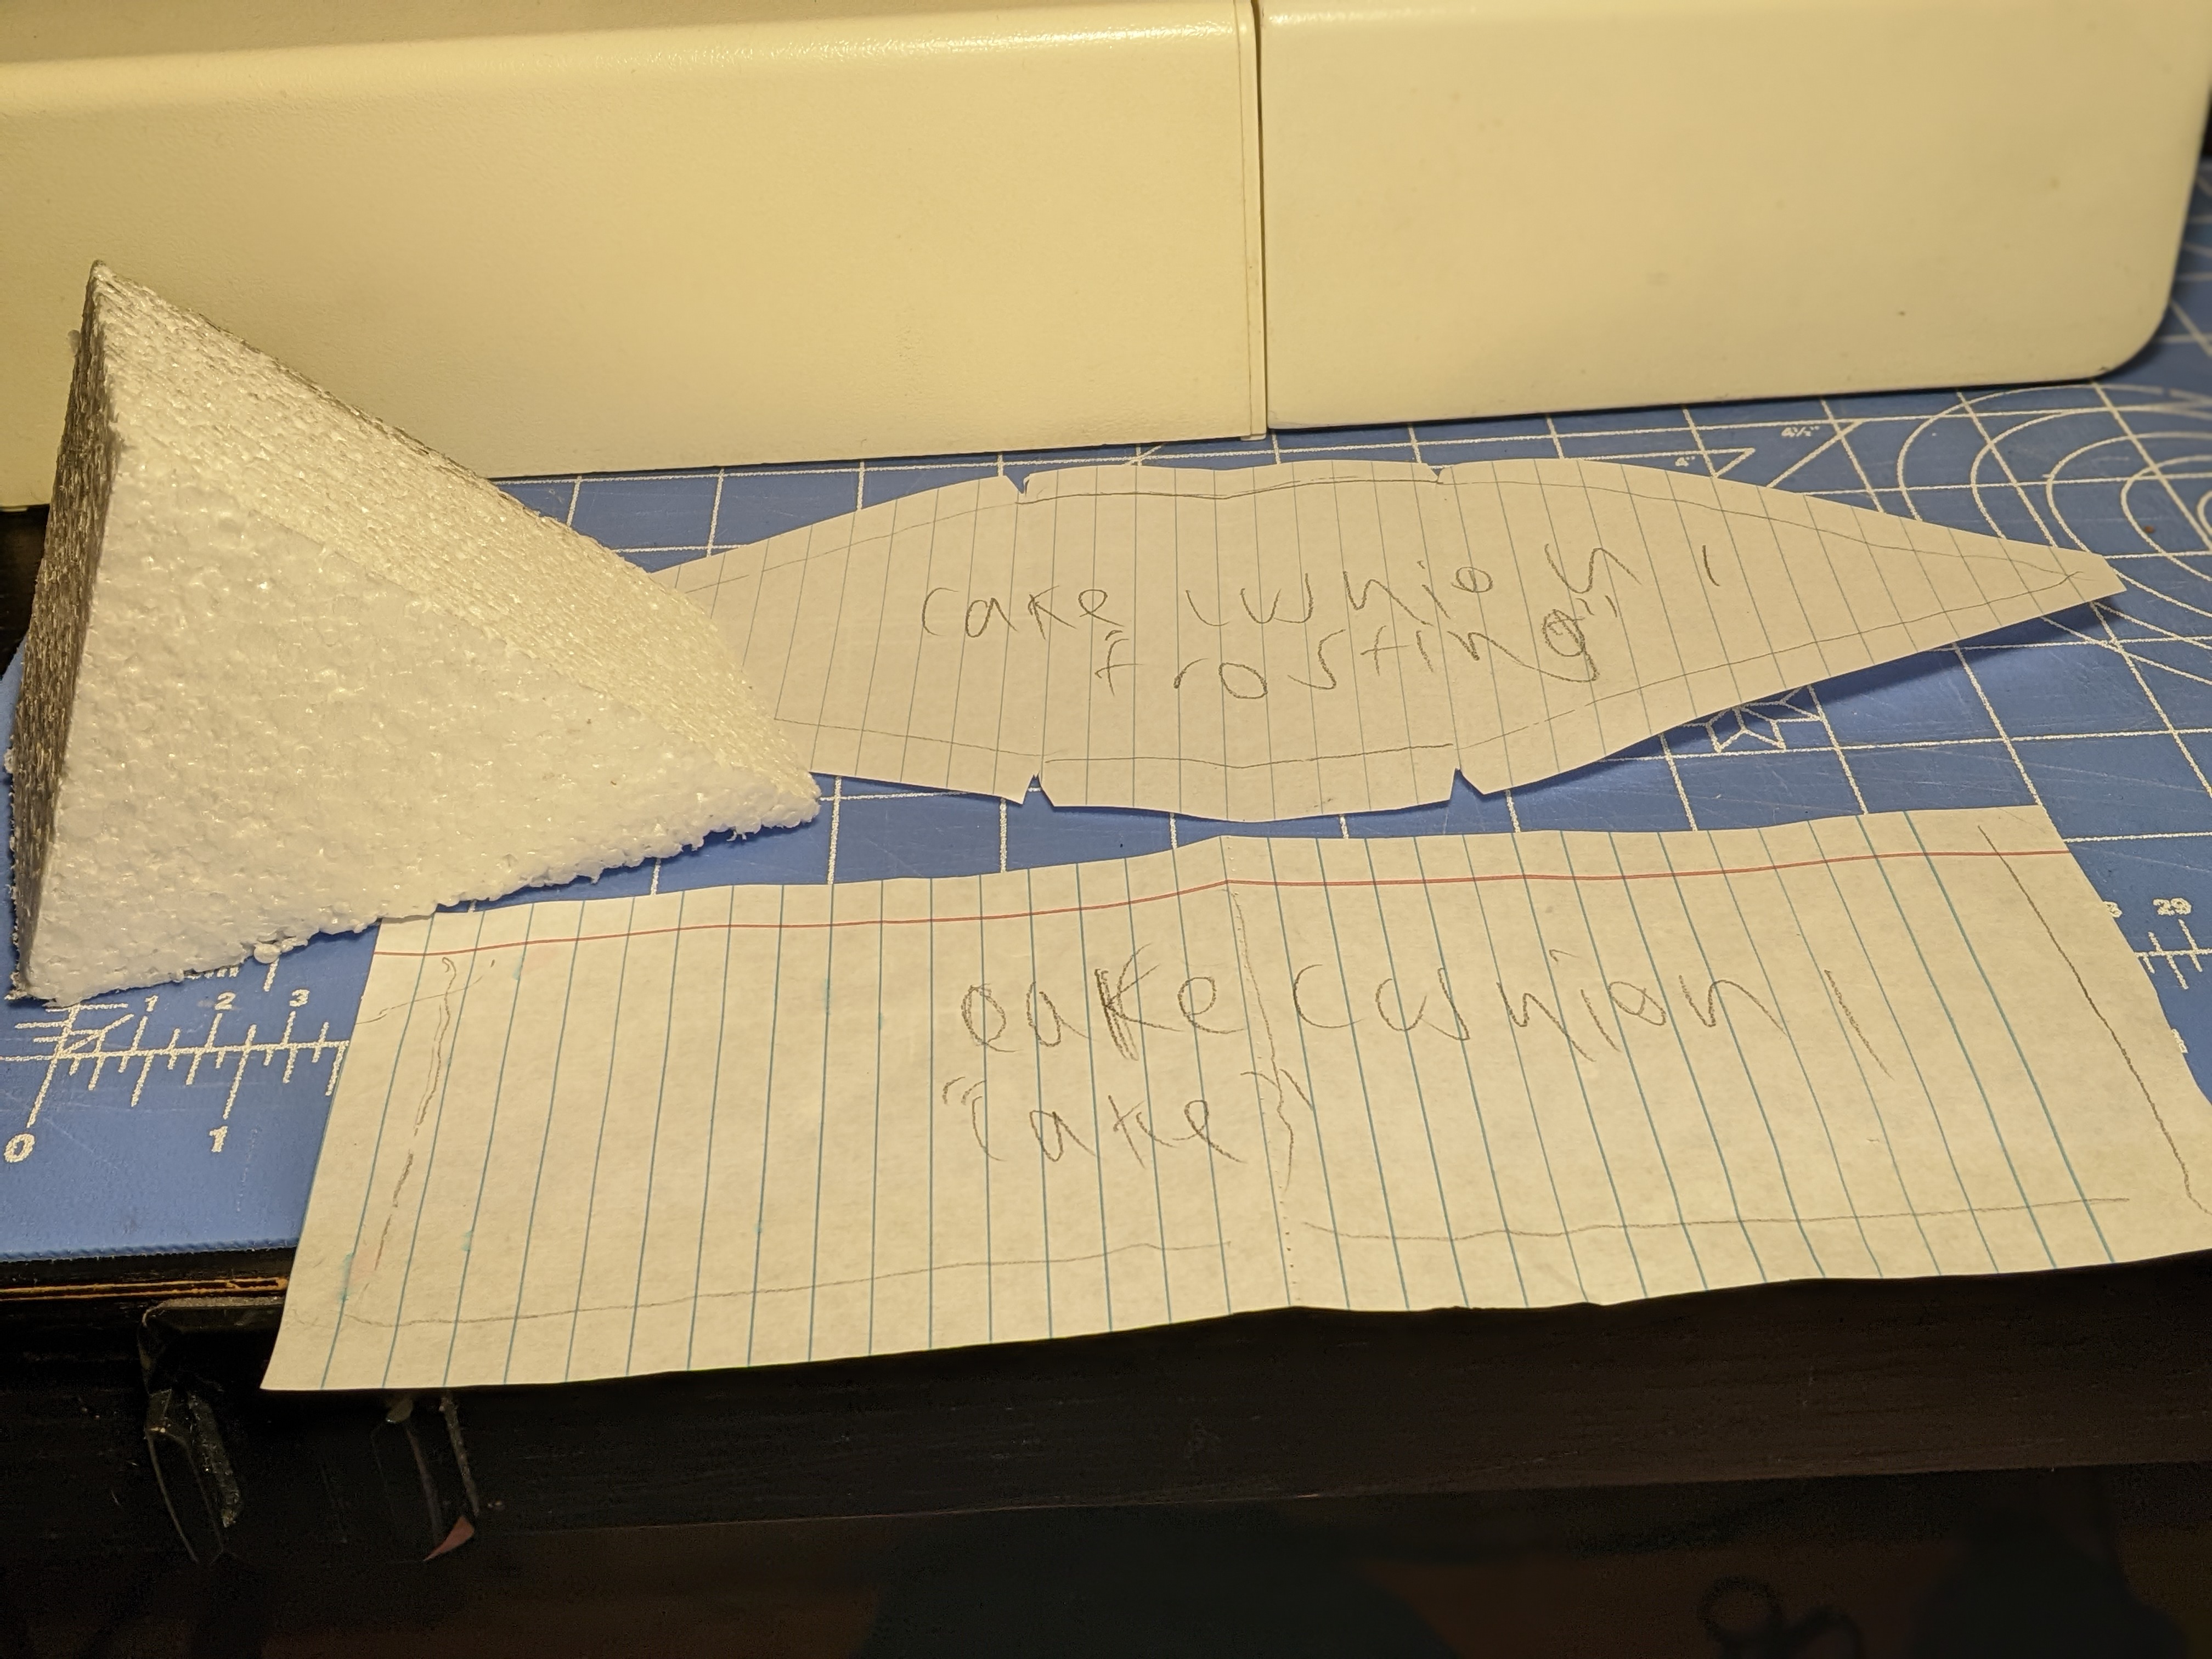
After I cut the foam to shape, I created paper patterns. I drew around each side of the foam block, making two groups of shapes. The "cake" section is basically two rectangles merged together. Then the "frosting" part is two triangles linked by a rectangle. I added a seam allowance to the pattern for each section, and then cut fabric for each one. I also added a rectangle of interfacing to the cake section to make it fold perfectly. 

I chose a multicolor polka dot fabric for the cake, because it reminded me of cake sprinkles. Apparently, the polka dot fabric and interfacing were from my great grandmother's fabric stash. The frosting fabric is a fuzzy striped knit. It would have been more interesting to have colored "frosting" but I couldn't find the right one.

After the fabric pieces were pinned together, I sewed two sides on the sewing machine. Then I tested to see if it fit on the foam. I sewed around the folded-under edge of the cake fabric rectangle, put the foam back in, and then Mom hand-stitched it to the frosting fabric.  

Wednesday, July 6, 2022

Braided Rug from Recycled T-Shirts

This is one of my largest t-shirt recycling projects. We started it several years ago, but took a break because I wasn't very good at sewing by hand. First, we cut all the shirts into strips. There's a few ways to do this. There's the t-shirt yarn method we learned at Maker Faire- cut the shirt into a long continuous strip by cutting in at the hem and then going around and around. Or we could lay the shirt flat and cut across with a rotary cutter on a cutting mat, making loops. These could be looped together, or cut at the end and then sewn together to make long strips, which is what we did. We decided it was easier to only sew on one or two strips at a time so it wouldn't get tangled when braiding. The strips tend to curl, which is good if you want to hide the patterns or pictures on the front of the shirts. There's some Mickey Mouse and other cartoons hidden in this rug.


Mom did most of the braiding, and I spliced the strips together. Then we used a heavy sewing thread to hand stitch the braid into a large spiral.